After yesterday's rainy afternoon, thing have dried out, so I was able to make some more progress with The Luggage. The air was also drier, so the stain finally felt drier as well. The dewpoint doesn't get over 60 degrees much around here, but it did over the last couple of days, preceded by a day or so when it was nearly that high. With the dewpoint back in the lower 50s, working was easier.
My first job today was to reinforce the bottom of The Luggage with sections of the two 1 x 4s I'd gotten. So I cut four pieces (after measuring twice - I remember some bits of handyman advice at least) to fit lengthwise, using a powered jig saw I hadn't used since the '90s. I applied glue after making sure they all fit - some were a little tight, which was OK. Once the glued boards were in place, I put the wheels on top of them. Since they weigh five pounds each, I thought they'd hold the boards down. I didn't take a picture at that point, so this one to the right shows the boards after the next step.
After an hour or two, I got the new drill out, took out the wheels, marked the hole positions on the bottom of the overturned Luggage, then began drilling. Maybe I should have waited because getting the holes drilled through turned out to be tougher than I thought. It was probably the glue impeding the drilling, but eventually I got all the holes done.
I put the wheels in place and threaded the bolts down into the interior. They all went in, although a few took a bit of gentle coaxing with a lightly applied hammer, which did not damage the threads. I flipped The Luggage upright. As expected, a few bolts promptly fell out, but at least one or two for each wheel stayed put. Then I opened packages of wingnuts.
That's when I realized I hadn't allowed enough clearance between the bolts and the sides for the wingnuts to turn. Oops! But again, I was able to get at least two on per wheel. Looks like I'll be making another trip to Home Depot tomorrow to get some regular nuts. Also I'll need one more bolt because one turned out to be a size smaller than it should've been. As Roseanne Roseannadanna said, "It's always something. If it isn't one thing, it's another." At least this is easily corrected.
Why wingnuts? The idea was it would be easy to remove the wheels and put them inside The Luggage for transporting in a car. It'll still be possible, but I'll have to make sure I have the right sized wrench handy.
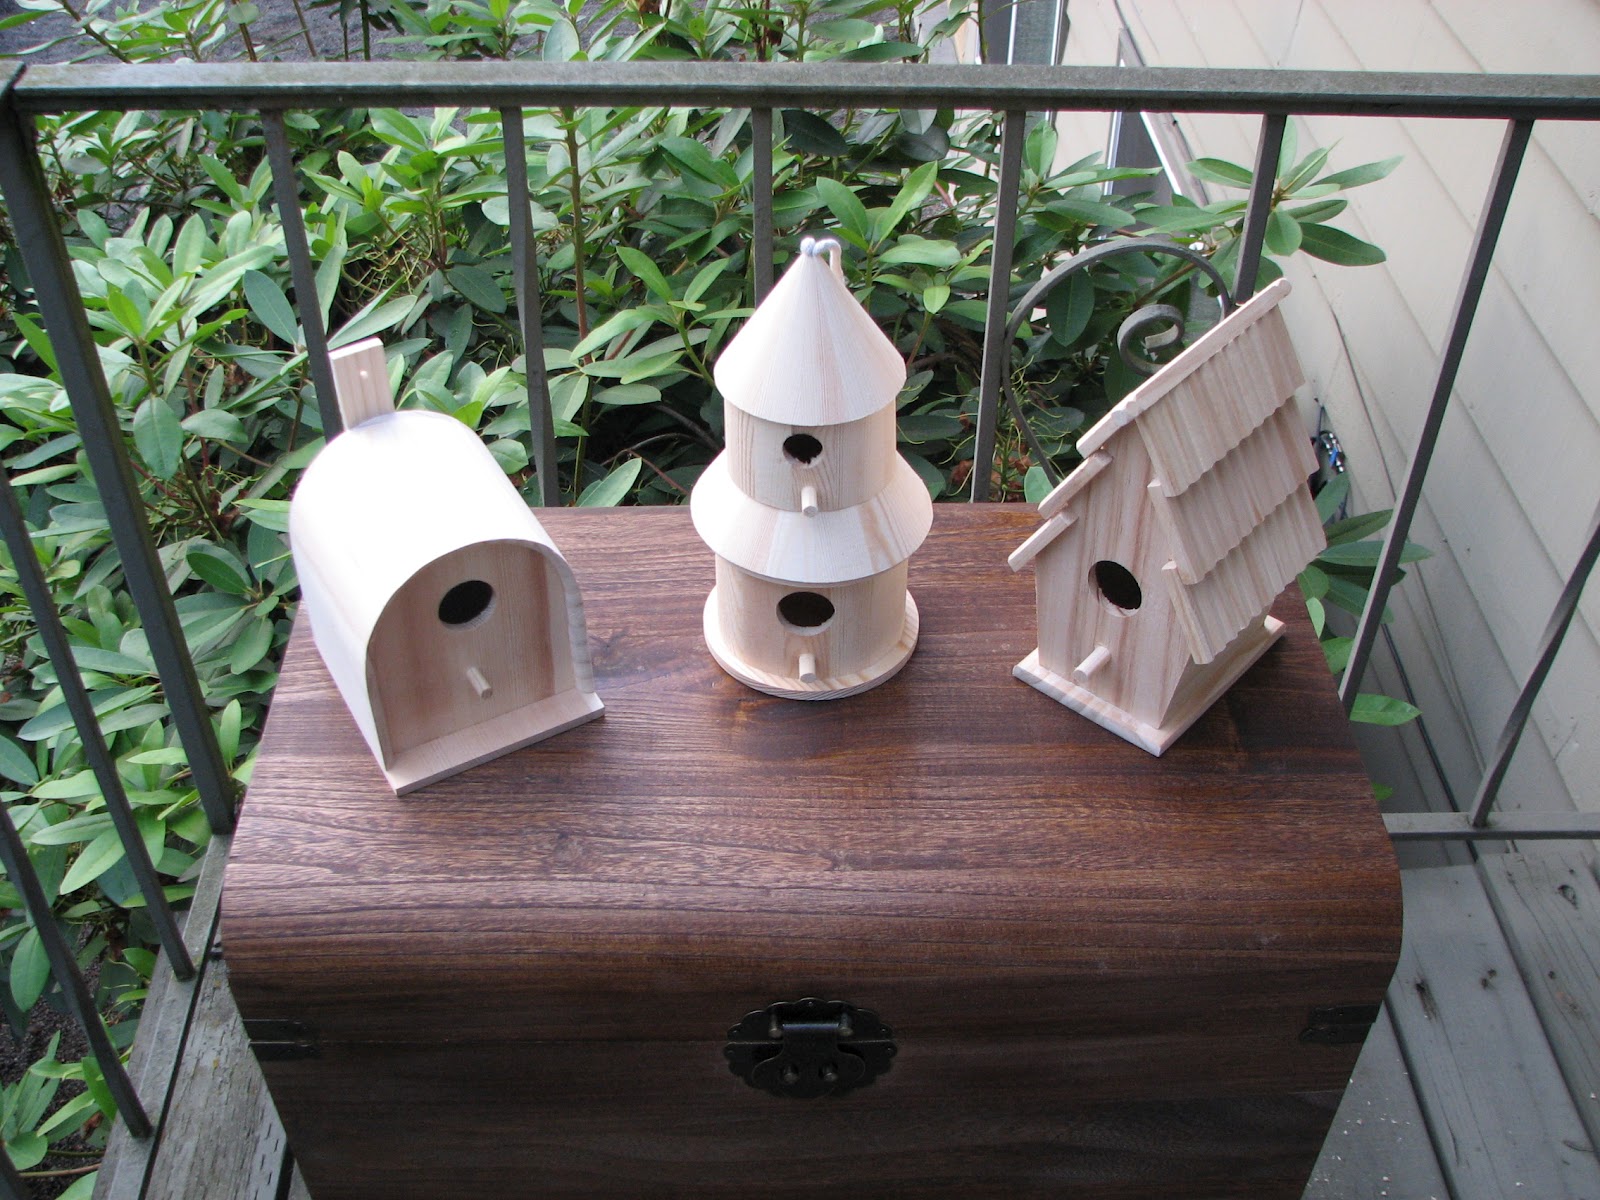
In spite of the rain in the afternoon, I still got something done earlier yesterday. Craft Warehouse had a two-day sale this weekend, so I got down there early to get some 60% off birdhouses that I want to turn into faerie houses. I got five different types and a couple of other things, then came back home. After checking stuff online, I decided to get them out of the bags.
One of the birdhouses has a curved roof. It's on the left in the picture to the right. As I took the birdhouses out and found places for them to sit, I took a look at the curved-roof one. Suddenly the word "vardo" came to me. Vardos, if you don't know, are the small wagons the Romani people travel in. I thought of Tricky Pixie's description of their CD Mythcreants - "Gypsy Celtic Folk Rock for Naughty Punk Faeries." Aha! Gypsy faeries!
With that in mind, I made another trip down to Craft Warehouse to see how many more of those birdhouses they had. At first I only found one and was a little disappointed. There were more with barn-style roofs, but I wasn't all that thrilled about them. Then I looked up and saw two more on a high shelf. I was just able to reach them. After that I saw there were two more behind the ones I'd just retrieved. There were some dowels handy, so I grabbed one, stuck it through the hole in each house and was able to move them forward so I could reach them. Now I have six future gypsy faerie vardos. And less than four weeks to get them ready, along with costume stuff and clock hats. Good thing I'm not working elsewhere for pay!
Next I asked a clerk if they had miniature wagon wheels. They did, but the spoked ones were rather pricey and I needed either 12 or 24 depending on whether the vardos would have two or four wheels. Then we spotted some slightly smaller wheels that came 12 to a package for $2.97. So I got two packages for 4-wheeled vardos. They're only 1 1/2" in diameter, but they'll look like wheels you might see on a modern vardo. This picture, from the Flickr page of Shirley Two Feathers, gives some idea of what I'm going for, although it won't be quite as fancy. Looking at images for vardos, I see my imagination can range quite freely in finishing each one off. Oh yeah, each one will have little Oregon license plates like the one I did for The Luggage. These should get done much faster now that I more or less know what I'm doing. Hmm ... maybe I should've waited until I did them before commenting!
The weather forecast is looking better from here on out, with only some early showers possible on Tuesday, otherwise it'll be partly cloudy or sunny every day. Looks like the Northwest saying of "It'll be dry by the Fourth of July is going to work again. That's good because I'd like to work out on the little deck more.
Sunday, July 1, 2012
Friday, June 29, 2012
The Luggage's License Plate
Since The Luggage will have wheels, it is appropriate to give it a license plate. I found an image of an Oregon plate with only two numbers on it that were not overlapping the land areas. It wasn't too hard to create that part using GIMP's clone tool, making sure the water shades matched, and changing the expiration year was pretty simple too.
Next I decided the plate needed a frame with custom wording on it. I found a frame image and blanked out some type in the middle. Then I had to look up how to make everything in the middle and the edges transparent. Once I got that, the edges of the transparent areas were a bit ragged, so I took some time with the eraser tool with the image blown up to 800 percent.
The next step was to cover up the existing words on the frame using the clone tool, again relatively simple, then adding my own words, getting the size and centering right.
I had to resize both images so when I put the license plate layer behind the frame layer, they would match up all right. That was a bit tricky and took some experimenting.
Next was printing, which turned into a real learning experience. To get better quality and also have the plate printed on something a bit better than plain paper, I decided to use photo paper. I put the paper in properly, but I could not get the file to print on anything but 8.5" x 11" paper. Also, the photo paper kept jamming. Eventually I looked at the printer manual, something I'd found while lifting the printer to get into the back to fish out a piece of photo paper.
It turned out the only thing the manual said for printing photos was to do it from an SD card like the one that goes in my camera. So I put the card in the computer slot and copied the file. I thought it was the right size, but it kept coming out too large even when the paper didn't jam or get stalled so half the paper remained white and the other part had only some of the image. After a lot of attempts, I finally realized I needed an image a lot smaller than I'd originally thought it would be and placed on a canvas size of 4 wide by 6 inches deep. The image itself had to be rotated 90 degrees because the photo paper only fits in the printer one way - portrait style instead of landscape.
Eventually I got the whole plate and frame image on one piece of photo paper. It took 16 tries with the printer - 11 partial images and 4 blank jammed pieces of photo paper.
Looking at it, you can probably see that the frame overlaps the plate a bit. I considered changing the size so it didn't, but then I realized I've seen a lot of real plates with frames where the frame covers edges a bit too much.
Someone with real experience with an image program like GIMP probably could've whipped something like this out in an hour or less. It's taken me closer to four hours, simply because much of the time I was doing stuff I've either never done or only do occasionally.
Just now I realized the weather is playing more tricks. The forecast called for showers early today. There were none here. Then the kids in the pool stopped screaming for a little bit and I realized I was hearing the faint sound of raindrops. I clicked on the Intellicast metro radar and saw that there was indeed a shower. Since The Luggage is still out on the deck drying - it's still a little tacky in spots - I got out my golf umbrella that I bought for extra shade at Faerieworlds '09 - the really hot year - and put it over The Luggage with a bit of moving TL itself. Of course, then the rain stopped and a breeze came up, knocking the umbrella off the porch. In order to get it, I had to go out my door and walk all the way around the building. I put it back and tied a rope to keep it from blowing away again
Finally, I realized the numerals and letters on a Crater Lake plate are supposed to be white, not the dark blue I'd originally used. I'd already flattened the image because .jpg files can't be saved in layers. Trying to just change the color left ragged blue edges all around, so I put another layer over the image and matched the font and size as best I could. There's a little bit of blue around the edges, but you do have to look closely. I think it makes the white type stand out a bit since it's mostly on a light blue background. Strictly speaking, there should be a CA beside the larger type with the C over the A, but GIMP doesn't allow for type condensing (if it does, I haven't discovered it), so it's not there. Probably nobody will notice.

I'd also saved an image of a slow-moving vehicle triangle which you may have seen on pictures of Amish buggies. That was quick to do in GIMP - no real manipulation required except a bit of resizing. It took three tries to print, though. It turns out that this "Photosmart" printer is really bad at printing photos on photo paper. Oh well, it was cheap when I bought it and I rarely print out photos.
Thursday, June 28, 2012
The Luggage Gets a Coat of Stain
Here's The Luggage, perched on top of my cooler, which made a nice platform for the job of staining. This is with one coat of stain, which was still wet when I took the picture. It feels good to have done something that begins the alteration of the unfinished trunk into The Luggage. I imagine the second coat will improve the appearance, making it a bit darker overall.
I had been thinking of just using an old T shirt to wipe the stain on, but after a trip down to Gresham Town Fair - originally just to get some bread and jam at the outlet bakery - I found some cheap brushes at JoAnn's. They had a pack of three for $1.99. In the picture on the left, you can see two of the brushes on top of the can of stain. The 2" wide one is inside the former potato salad container with some stain I'll use on the next coat. I knew I was saving all those containers for a reason, I just didn't know what at the time.
Pulling all the materials together has been a bit more involved than I thought it would be, with more than a few trips by MAX and bus to round stuff up.
I had intended to start the staining this morning, but first I wanted to take my change from several years of saving to a Coinstar machine to get an Amazon card. I wanted to get an AC-powered air pump for my air mattress and a bucket hat for the Twoflower outfit. I'd gone to one at Fred Meyers in Gateway the other day, but that machine was set so you could only get a coupon that had to be used that day in the store. Yesterday I went to the nearest Albertson's. That machine was full and store people said they were having trouble getting service from Coinstar. So this morning, after checking locations of machines that give out Amazon cards, I went to the Safeway store that's a couple of MAX stops and a brief walk away. That machine was working, but when I punched the button to get an Amazon card, it said they are temporarily unavailable. So I returned home and decided to order anyway, then later get the coins converted into a form I can either deposit or use for something else. After that I went to Gresham for the bread and stuff. That turned out to be a good experience because I bought two jars of strawberry jam and was able to get two loaves of bread from the $1 shelf for free.
I need to drill 16 holes to mount the big casters. I have a battery-powered Black & Decker drill which I haven't used in a few years - being in an apartment, there's not much call for one. So I plugged in the battery charger to charge the batteries. They didn't charge. So yesterday I made a trip to Home Depot, where I'd originally bought the drill. B&D isn't making tools for VersaPak batteries any more. Home Depot had only one battery and it was $24.97. Two would have cost more than I'd spent for the drill in the first place. The HD person mentioned Harbor Freight as an alternative, so I went there by bus.
HF didn't have the batteries either, but they had a 3/8" drill for $19.99. I thought I had a 3/8" bit at home, so I didn't get one there. I did pick up a 25' extension cord and a couple of small LED flashlights, though. Of course, I got home and discovered, no, I didn't have a 3/8" drill bit. So back out again, this time to an Ace Hardware store reached by a MAX and bus trip. It was nearly $6, so I'm spending about $26 for 16 3/8" holes. Well, I'll probably need to drill more to mount something for the rope to pull The Luggage around, and I may add some wood screws to make the bottom, which I'll reinforce with pieces of the boards I got a few days back, more secure. Turns out the bottom of the trunk is much thinner than the sides.
I took a break from typing this post to go out and give The Luggage another coat of stain. This pic, like the first one, is a flash pic shot from just inside the sliding door to the deck. It is darker, although not too much darker.
The local weather radar was showing some showers moving through, but other than some light sprinkles, not much reached the ground. I waited a bit to start the staining, but things didn't get wetter. From the radar, it looks like that's over and done with, so I can leave The Luggage out to dry rather than bring it in and smell stain all night. Fingers crossed on that.
While there are morning showers in the forecast for tomorrow, I'm hoping I'll be able to do some cutting up of boards to reinforce The Luggage's bottom, drill the holes and mount the casters. I might have to get some wood screws even though I'm gluing the boards to the bottom on the inside. I'll also have to prop the lid open to stain the edges of it and the sides. I may line the inside with fabric or just stain it. Then I need to make, paint and mount the teeth. They'll be made out of craft sticks (they look a lot like popsicle sticks, although these are wider. I bought some antique white paint, an off-white color, at Craft Warehouse, because I doubt The Luggage brushes. I've got some mangled butterfly wings to stick in the teeth. There will be fangs!
Saturday, June 23, 2012
The Luggage: Casting and Swiveling
I've finally, I think, got what I needed in the first place for wheels for The Luggage. While I initially thought the wheels from a stroller I bought would save lots of money, when I started buying stuff to attach them to The Luggage, things began adding up. Nuts and bolts, washers, braces, etc. that I bought the other day cost almost as much as the caster wheels I'd originally considered getting at Harbor Freight. Add in the stroller and it was pretty much the same.
I got stuff during a trip to Home Depot after lots of looking around, asking questions, thinking, etc. But once I got home, some braces I thought were going to be a tight fit turned out to be a bit loose. It got me thinking that whatever I bodged up just wasn't going to stand up to The Luggage being hauled over the ground of what is, for most of the year, a pasture. Plus I began to think I was doing something I have a tendency to do with some projects - overthinking stuff.
So, going for simplicity, I decided to abandon the stroller and consider the money paid for it as chalked up to experience, with most of the hardware to be returned unopened to Home Depot. So I went down to the bus and took another trip out to Harbor Freight.
Once there, I picked out two 5" swivel casters and two 5" fixed casters. But I couldn't shake the feeling that they might not be great on the rough ground. They're a bit smaller than the stroller wheels, which are 6". So I looked a bit more at other wheels on nearby shelves. They have wheels, some more like 8" but needing axles and hardware to hold them on.
Then a bit further down the row I saw some bigger casters. They're inflatable 8" wheels with swivels at $11.69 each (at right) and fixed ones for $9.99. $43 and change - more than the basic unfinished trunk cost, but really not all that much more than I would've otherwise spent, and these wheels should handle the terrain. They'd better. They not only cost more, they're probably heavier than the trunk itself with all the metal. I put them on the bathroom scale and the four of them come to just shy of 22 pounds. Also, according to the receipt, each wheel was on sale at $5.00 and $5.30 off.
I'll add a couple of 1" x 4" boards to the underside of the trunk for reinforcement and that should make things sturdy enough. Hiding the wheels will be some kind of skirting - cloth or wood to be determined, but whichever, I'll have pictures of lots of feet.
Although Harbor Freight sells all kinds of tools and accessories, they don't sell stuff like nuts and bolts. I'll have to make a trip back to Home Depot for those, but I've got to go anyway to return stuff.
When I was originally thinking of making The Luggage mobile, I thought of just getting a small Radio Flyer-type wagon. That would've been so simple. Then I saw how much even the small ones cost these days, even on eBay.
I got stuff during a trip to Home Depot after lots of looking around, asking questions, thinking, etc. But once I got home, some braces I thought were going to be a tight fit turned out to be a bit loose. It got me thinking that whatever I bodged up just wasn't going to stand up to The Luggage being hauled over the ground of what is, for most of the year, a pasture. Plus I began to think I was doing something I have a tendency to do with some projects - overthinking stuff.
So, going for simplicity, I decided to abandon the stroller and consider the money paid for it as chalked up to experience, with most of the hardware to be returned unopened to Home Depot. So I went down to the bus and took another trip out to Harbor Freight.
Once there, I picked out two 5" swivel casters and two 5" fixed casters. But I couldn't shake the feeling that they might not be great on the rough ground. They're a bit smaller than the stroller wheels, which are 6". So I looked a bit more at other wheels on nearby shelves. They have wheels, some more like 8" but needing axles and hardware to hold them on.
Then a bit further down the row I saw some bigger casters. They're inflatable 8" wheels with swivels at $11.69 each (at right) and fixed ones for $9.99. $43 and change - more than the basic unfinished trunk cost, but really not all that much more than I would've otherwise spent, and these wheels should handle the terrain. They'd better. They not only cost more, they're probably heavier than the trunk itself with all the metal. I put them on the bathroom scale and the four of them come to just shy of 22 pounds. Also, according to the receipt, each wheel was on sale at $5.00 and $5.30 off.I'll add a couple of 1" x 4" boards to the underside of the trunk for reinforcement and that should make things sturdy enough. Hiding the wheels will be some kind of skirting - cloth or wood to be determined, but whichever, I'll have pictures of lots of feet.
Although Harbor Freight sells all kinds of tools and accessories, they don't sell stuff like nuts and bolts. I'll have to make a trip back to Home Depot for those, but I've got to go anyway to return stuff.
When I was originally thinking of making The Luggage mobile, I thought of just getting a small Radio Flyer-type wagon. That would've been so simple. Then I saw how much even the small ones cost these days, even on eBay.
Saturday, June 16, 2012
More Costuming & The Luggage
I'd been checking around to see about getting a red wizard robe for the Rincewind costume, but wasn't coming up with much. Too bad I don't sew, at least not enough to want to tackle making a whole robe. I was also looking into getting fabric dye or paint to color and existing grey robe I got in 2007 for my second time at Faerieworlds and my first as a wizard. I was also considering dyeing or coloring the Harry Potter Sorting Hat red.
It turns out the old robe is 100% polyester, and from what I was seeing on dye packages, that material comes out light. The hat is also mostly polyester. After a trip down to the Craft Warehouse and Jo-Ann's in Gresham earlier, during which I got a few things - X-Acto knife, blades, gold glitter glue to spell out WIZZARD on the hat (yep, the ZZ is not a typo), and some glow-in-the-dark stars, I got on the internet to look up robes.
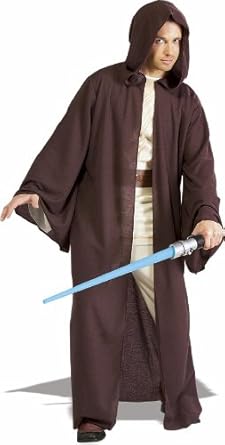
I first spotted the Jedi robe shown above on a page Yahoo pulled up. The price was $46 and change. Might've been shipping involved too. So then I checked on Amazon. Their price was $38.53 with free shipping (not super saver - their supplier ships free). This time I was smart enough to remember to order through one of my Squidoo lenses where I split commission with Squidoo. That'll save me about $1.63 (better than nothing). I also used reward points connected to my Amazon credit card, saving another $6.96. So the robe will end up costing me just shy of $30 - not bad. If I'd bought both dye and fabric paint, I might've ended up spending about half of that, so I'm ending up with probably a much better robe, a lot less work, but Rincewind will be clad in brown instead of red. The robe should arrive in about a week.
As for The Luggage, I haven't actually started work on modifications, but I have gotten more material. The best thing for transporting The Luggage on the uneven ground of the Faerieworlds Realm is wheels, preferably bigger wheels than found on typical luggage.
Getting the wheels was more of an adventure than I thought it would be. I checked Harbor Freight, where the website showed a store within easy walking distance of the end of the MAX line in Gresham. Except, the store moved several years ago but they never updated the website. I did a lot of walking several days ago, but there was no store where the website indicated. That was frustrating.
Later I remembered there was a store about a mile or more North of where I'd looked, so I took a bus to the shopping area where the store is really located. On the way to Harbor Freight, where I was contemplating getting four 5" caster wheels at $5.99 each, I had to pass a Salvation Army store. I thought I should check inside for tropical shirts for when I dress as Twoflower, the Discworld's first tourist and original owner of The Luggage.
I found a couple of shirts, then started checking around to see what they had that might have wheels on it. Tucked away in a small hidden section I found a few strollers. One looked quite promising. Instead of just having four wheels, there were four sets of two wheels. The front wheels are on casters so it's steered much like a grocery cart. The wheels were 5", just about right. The stroller was $7.49, far less than the $23.96 I would've paid at Harbor Freight for caster wheels. The shirts were only $7 for both. I did go next door to Harbor Freight, but all I needed was a hacksaw to attack the stroller for the wheels. That was only $3.99.
I also recently made a trip to Fabric Depot where I wanted to see if they had webbing similar to what's used for duffel bag handles. There was some red 1 1/2" webbing on the shelf, but not enough. I asked if they had any more in stock. The clerk came out with a fresh roll of 10 yards. She said if I wanted the whole roll, I could get it at the wholesale price of 40% off the $1.59/yd. or about 95 cents a yard. Considering how I plan to use the webbing, I'll need enough so getting the whole roll at wholesale is a good deal. I also got some decorative upholstery nails.
The wizard hat I've been wearing since 2007 will get some new butterflies, the Flitter Faerie and the Wendy Froud faerie along with little lights. I hadn't planned on taking a picture of the hat, but when the faeries saw me taking other pictures, they were rather insistent that they get their picture taken as well. You may notice there aren't too many butterflies on the hat just now. They kind of got smooshed last November on the flight back from New York. Wendy's faerie is perched atop the Star Trek shuttle model/radio with new butterflies almost covering her up, and the Flitter faerie is in front of a couple of the new butterflies. The hat sits right behind me when I'm at the computer, so the faeries keep an eye on stuff.
It turns out the old robe is 100% polyester, and from what I was seeing on dye packages, that material comes out light. The hat is also mostly polyester. After a trip down to the Craft Warehouse and Jo-Ann's in Gresham earlier, during which I got a few things - X-Acto knife, blades, gold glitter glue to spell out WIZZARD on the hat (yep, the ZZ is not a typo), and some glow-in-the-dark stars, I got on the internet to look up robes.
I first spotted the Jedi robe shown above on a page Yahoo pulled up. The price was $46 and change. Might've been shipping involved too. So then I checked on Amazon. Their price was $38.53 with free shipping (not super saver - their supplier ships free). This time I was smart enough to remember to order through one of my Squidoo lenses where I split commission with Squidoo. That'll save me about $1.63 (better than nothing). I also used reward points connected to my Amazon credit card, saving another $6.96. So the robe will end up costing me just shy of $30 - not bad. If I'd bought both dye and fabric paint, I might've ended up spending about half of that, so I'm ending up with probably a much better robe, a lot less work, but Rincewind will be clad in brown instead of red. The robe should arrive in about a week.
As for The Luggage, I haven't actually started work on modifications, but I have gotten more material. The best thing for transporting The Luggage on the uneven ground of the Faerieworlds Realm is wheels, preferably bigger wheels than found on typical luggage.
Getting the wheels was more of an adventure than I thought it would be. I checked Harbor Freight, where the website showed a store within easy walking distance of the end of the MAX line in Gresham. Except, the store moved several years ago but they never updated the website. I did a lot of walking several days ago, but there was no store where the website indicated. That was frustrating.
I found a couple of shirts, then started checking around to see what they had that might have wheels on it. Tucked away in a small hidden section I found a few strollers. One looked quite promising. Instead of just having four wheels, there were four sets of two wheels. The front wheels are on casters so it's steered much like a grocery cart. The wheels were 5", just about right. The stroller was $7.49, far less than the $23.96 I would've paid at Harbor Freight for caster wheels. The shirts were only $7 for both. I did go next door to Harbor Freight, but all I needed was a hacksaw to attack the stroller for the wheels. That was only $3.99.
I also recently made a trip to Fabric Depot where I wanted to see if they had webbing similar to what's used for duffel bag handles. There was some red 1 1/2" webbing on the shelf, but not enough. I asked if they had any more in stock. The clerk came out with a fresh roll of 10 yards. She said if I wanted the whole roll, I could get it at the wholesale price of 40% off the $1.59/yd. or about 95 cents a yard. Considering how I plan to use the webbing, I'll need enough so getting the whole roll at wholesale is a good deal. I also got some decorative upholstery nails.
Saturday, June 9, 2012
The Luggage 1: Acquisition
Instead, I got the hand truck, a bit of rope and a stretchy cord with hooks and hopped on the MAX. Although the trunk isn't all that heavy, it is bulky, so just trying to carry it by the handles would've been difficult.
One I got the trunk and paid for it, I secured it to the hand truck while outside the store, then stopped into the bakery outlet next door that sells Orowheat bread for half or less than what regular stores charge. Got a couple of loaves and a couple of jars of strawberry jam, which went in my backpack. The trip home was no trouble at all.
These pictures show what The Luggage looks like before any modification. It's not the sturdiest trunk in the world, but it's a prop, not something for traveling by tramp steamer and on into the dark interior jungles of Borneo. Still, there is a good deal of room in it, so I'll probably pack some light stuff for the trip to Faerieworlds and perhaps use it for carrying around snacks, costume changes, etc.
The next thing I want is a set of casters to mount on the bottom. The casters should have big wheels. I'm thinking 5" wheels will make it easier to maneuver over the rough ground of The Realm. 6" casters would be better, but 5" casters cost $5.99 each and 6" casters are around $14.99 each at the Harbor Freight store. I checked Amazon, but Harbor Freight is cheaper.
The trunk is 25 1/2" wide by 15 1/2" deep by 17 1/2" in height including the lid. Knock off an inch for inside measurements, except the depth from the bottom to the top of the box, minus the lid, is 13 1/2".
As this project develops, I'll try to remember to take pictures to show how things are coming along.
Rincewind and The Luggage
I headed out to Gresham Town Fair this afternoon, intending to see if JoAnn Fabrics & Crafts had little bird houses for a buck apiece. I had thoughts of buying a bunch to make into faerie houses - rather small faerie houses. They were still being sold for a buck. I looked around a bit more there to get ideas for stuff needed for modifications, but I wanted to check out Michael's and a Dollar Store down near the end of the MAX line. Also on the way to the MAX I stopped into the Craft Warehouse in the Town Fair.
Originally I intended just to get some more tiny light strings for the steampunk top hats I need to finish. I got the lights and a few doodads to add to the hats. Meanwhile, outside, a downpour had begun, so I took my time. I looked around for more materials ideas and while doing that, spotted some unfinished trunks for $29.99 and $35.99. Suddenly I realized what the Rincewind persona I've decided on needed: The Luggage! That's it (to the left) in the lower part of the cover of Terry Pratchett's first Discworld novel, The Colour of Magic. The Luggage first belonged to Twoflower, Discworld's first tourist, then later it became Rincewind's. The Luggage is made of sapient pearwood and moves about on lots of little legs. It's very loyal to its owner and can be very dangerous to anyone trying to harm said owner - as in devouring the offender.
I also had the thought that with The Luggage, I could wear Bermuda shorts, a Hawaiian shirt and a floppy hat and be Twoflower. I've got the shorts and hat, so I'd only need a Hawaiian shirt or something similar. I can modify a book into a "phrase book" which I can pull out, open, and ask questions in a somewhat loud and carefully enunciated voice. Of course, it would be fun to say slightly, or maybe not so slightly, wrong things as in the Monty Python sketch where the "Hungarian" (John Cleese) would say things such as, "My hovercraft is full of eels."
Tomorrow (this was written late on Friday and now I see the next day I forgot to send it), and for several days after, the weather is supposed to be drier, so I'll probably get a lot of material-foraging done. I've been discovering lots of places to buy materials down in the Gresham area since I opened the credit union account.
Subscribe to:
Posts (Atom)